How to Set up Rayobyte in Incogniton

Welcome to the ultimate guide to unlocking the power of Rayobyte (formerly BlazingSEO) proxies within the Incogniton browser. This walkthrough will guide you through the process of seamlessly integrating Rayobyte proxies, enabling you to experience truly incognito browsing. 

Whether you’re a proxy veteran or a newcomer to the domain of proxy configuration, this article has you covered. Get ready to explore the synergy between Rayobyte’s proxy services and the Incogniton browser for enhanced privacy and protection. 

Let’s dive right in!

Rayobyte Incogniton integration

How to Set up Rayobyte in Incogniton

Step 1: Sign up and Sign in to Incogniton (Free)

Skip to the next part if you already have an Incogniton account. If not, follow these steps to set up your Incogniton account for free:

  • Visit incogniton.com and navigate to “Download” on the navigation bar.
  • On the download page, click the download link for your device’s OS (Mac or Windows) to start downloading the Incogniton app.
  • After the download completes, install the Incogniton desktop app on your computer by following the installation steps.
  • Go back to the Incogniton website.
  • In the hero section, click the “Try 10 browser profiles for free” button to access the pricing page.
  • Explore the available plans, including Starter (free), entrepreneur, professional, and multinational. You can opt for the Starter (free) plan if you’re new.
  • Register and create your Incogniton account as per the provided instructions. Once done, you’ll get your login details.
  • Open your Incogniton app and sign in using your login credentials.

That’s it! Your Incogniton account is up. Up next, we proceed to set up your ASocks proxy.

Step 2. Set up a Rayobyte account

Once again, you can skip this step if you already have a Rayobyte account.

  • First, visit the Rayobyte website via this link. Click the Login button on the top right corner of the page — you will get a dropdown of the different proxy dashboards.

  • Select the proxy type of your choice (Residential or Data Center & ISP dashboard).
  • Follow the sign-up/login instructions provided by Rayobyte.
  • Once you have successfully completed the sign-up process, you will be redirected to your dashboard. Now let’s buy some proxies.

Step 3. Purchase a Rayobyte proxy

  • Read Rayobyte’s instructions on how to purchase a proxy on your Rayobyte dashboard. 
  • Navigate to the “Buy New Package” tab via the sidebar.
  • Choose your plan and fill in other required details. 
  • Click the “Check Out” button to continue. See the images below.

Please note that for the sake of this guide, we purchased the IPV6 proxy. However, while they are more affordable than the IPV4, they don’t work on all websites. If you use Incogniton for social media management we always advise using IPV4 proxies.

Also, as indicated in the image below, connecting your IPs to your account may take a few minutes, typically 3-5 minutes. 

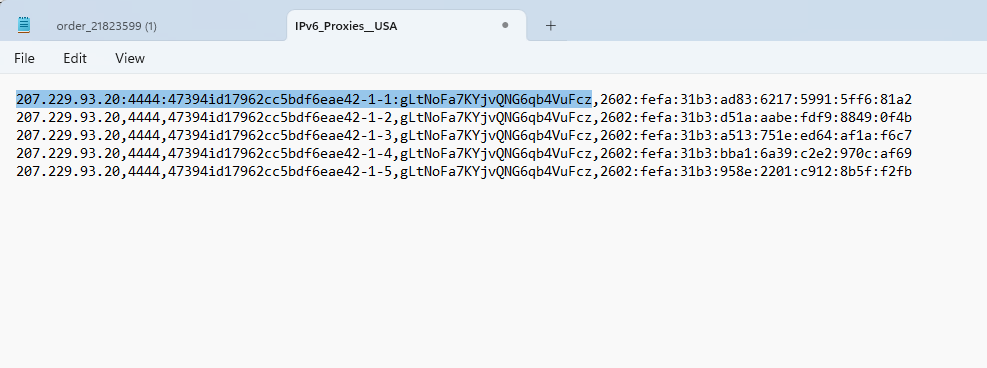
Next, you will receive the proxy details. Ensure you replace the “ , ”  with “ : ” in the proxy port string. See the selected text in the image below.


Step 4. Integrate the Rayobyte Proxy port with Incogniton

  • Open the Incogniton browser and navigate to “Profile Management’ on the sidebar. Click on the “New Profile” button

  • On the Profile Overview page screen, click on the “Proxy” button on the sidebar
  • Proceed to fill in your Proxy details. The Proxy username is the login provided by ASocks.
  • Upon completion, click “Check proxy” and “Create profile”. See the image below.

Congratulations! You have successfully integrated your ASocks proxy with Incogniton. To activate it, simply click the “Start” button on your new profile. You can now browse the internet with peace of mind knowing that your privacy and anonymity are guaranteed.

Conclusion

From multi-accounting to scraping the web, setting up Rayobyte proxies with the Incogniton browser sure opens you to a new world of secure browsing and private data protection. Sometimes all you need are the right pieces to ensure everything falls into place, and this duo could be just that for you. 

By following the steps laid out in this article, you will, in actuality, experience true private browsing – as promised in the beginning. Enjoy a safer online experience, shielding your data and identity with the combined strength of Rayobyte and Incogniton.

What are you waiting for? Join >400K users now!

Frequently asked questions (FAQ)

An IPv6 proxy is an IP address using the IPv6 protocol, introduced in 2012 to address IP shortages. It’s longer and more complex than IPv4, containing both numbers and letters. IPv6 offers an immense number of unique addresses, solving the scarcity issue.

Here is an example of an IPv6 address: 2600:1f18:4445:93a0:0000:4a2b:8c71:ab12

However, despite its benefits, IPv6 adoption lags behind IPv4 due to compatibility challenges. Transitioning requires a complete upgrade of ISPs, data centers, and more. As a result, many websites, including major ones like Amazon, Twitter, Reddit, and Yelp, still lack IPv6 support.

A proxy browser employs a proxy server to connect to the internet. Acting as a mediator between your device and the web, the server receives and forwards your requests, enhancing privacy by masking your IP address.

There are various proxy types, each serving specific purposes:

  • Residential Proxies: Use IPs from ISPs, appearing like regular users. Static Residential proxies, known for high reliability, are often preferred in Incogniton.
  • Datacenter Proxies: Hosted in data centers, offering speed but may not be as discreet.
  • Mobile Proxies: Mimic mobile users, useful for app testing and social media tasks.
  • Shared vs. Dedicated Proxies: Shared among users vs. dedicated for an individual, allowing more control.
  • Static vs. Rotating Proxies: Static maintain a consistent IP while rotating change IPs automatically.

As you may have noticed, selecting a proxy would depend on your specific needs. However, for Incogniton, the reliability of Static Residential proxies often makes them an ideal choice. 

If you encounter any challenges integrating Rayobyte with Incogniton, feel free to contact our support team at [email protected].

Formerly known as BlazingSEO, RayoByte is a US-based proxy provider under the Sprious group. The main focus is on dedicated data center proxies, with a range of proxy products available, including residential proxies, ISP proxies, data center proxies, and mobile proxies. 

With 24/7 live support and a 99.9% uptime guarantee, RayoByte ensures a secure and uninterrupted browsing experience.

A digital fingerprint is a distinct and individualized digital marker encompassing data about a user’s browser, browsing pattern, and device, enabling companies to identify and monitor online users and their devices. 


In simpler terms, a digital fingerprint is like a special mark that websites use to remember and follow you when you use the internet. If you’re interested in more details, we have a dedicated article that goes into further depth on browser fingerprinting.

To create a new browser profile, follow the steps below:

  • Open your Incogniton browser.
  • Click on the “Profiles” tab or the profile icon.
  • Select ” New Profile”
  • Enter your proxy details and submit. And your profile is ready!


For detailed instructions and visual guidance, refer to our comprehensive guide on creating a new browser profile.

If your proxy isn’t functioning as expected, ensure that you have accurately entered the proxy details, including PROXY, Username, and Password. If the issue persists, perform a proxy test using this link: Test Proxy with Firefox FoxyProxy.

If troubleshooting doesn’t resolve the problem, we recommend contacting your proxy supplier for further assistance.