
Getting Started – Create Your First Browser Profile in Incogniton
Creating separate browser profiles in Incogniton keeps you organized and undetected – perfect for web research, social media, or e-commerce. Did you download the app and not sure where to start? This step-by-step guide gets you browsing in no time.

How to create your first browser profile
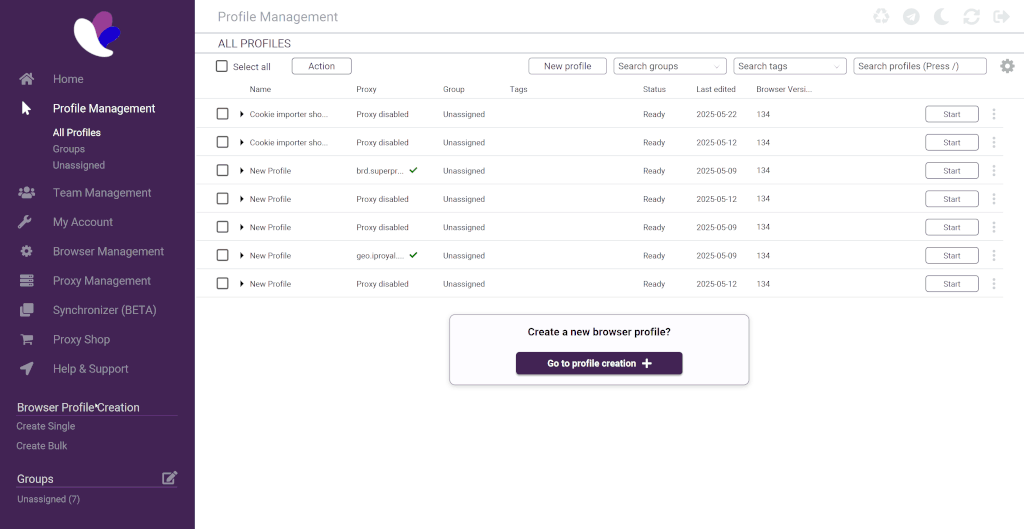
Step 1: Go to Incogniton and create profile
Navigate to the Incogniton app and create a profile. There are several options to get started. Click on:
- Create Single down left
- New profile up right
- Go to profile creation in the middle
Step 2: Fill in profile details
Fill in all the details of your profile by adding:
- Name: Pick a name for this browser profile.
- Group: Select a group or leave it unassigned. You can also add a group first.
- Operating system: Choose the correct operating system, Windows or Mac.
- Browser version: Select the browser version of the Incogniton browser you want to use. We recommend to always choose the most recent version.
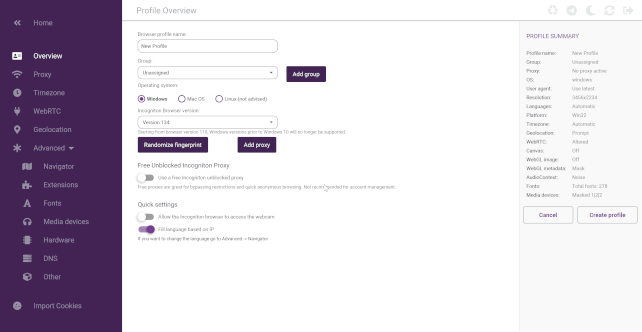
Randomize fingerprint
After filling in all the details, you can hit the button Randomize fingerprint. This causes the hardware configuration and navigator settings of the browser profile to randomly change. This setting is optional.
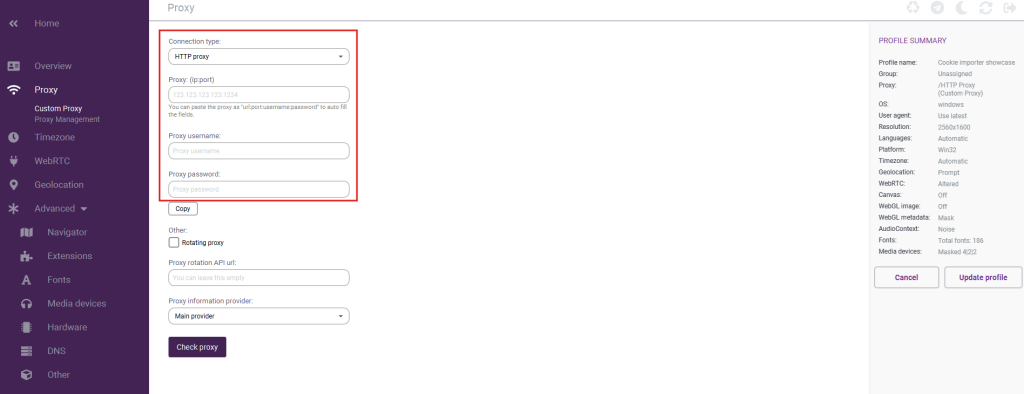
Step 3: Add a proxy
The next step is to add a proxy to your first browser profile. You can click on Add proxy in the profile overview or navigate to the proxy settings by clicking on Proxy in the left-side menu. Fill in the following details:
- Connection type: Select a HTTP proxy, Socks 4 proxy or Socks 5 proxy.
- Proxy: Fill in the proxy details provided by your proxy seller. This includes the IP port and proxy username and password.
Click on Check proxy to find additional information about the proxy.
Choose the proxy option that fits your needs
Learn more about the proxy options below.
FREE proxies provided by Incogniton
Switch on the Free Unblocked Incogniton Proxy in the profile overview to use Incogniton’s free built-in proxy feature.
Built-in proxy shop
Go to the Incogniton app and click on Proxy shop in the left-side menu. Choose the proxy type (mobile, residential, datacenter or ISP), select the number of proxies you need and choose the provider and geolocation. Fill in your payment information and complete the payment process.
External proxy supplier
Select an external proxy supplier you wish to use with Incogniton and add the proxy details to your browser profiles.
Step 4: Start using your Incogniton profile
Click on Create Profile to finalize the process. You’ve just made your first browser profile in Incogniton! Select Start in the profile overview and start browsing.
Table of Contents
Frequently Asked Questions
Is Incogniton a desktop app?
Yes, Incogniton is a desktop application and is available for both Windows and Mac operating systems. You can download the app here.
What are proxies?
Proxies act as intermediaries between a user’s device and the internet, meaning you can access a website indirectly. The internet traffic is rerouted through the proxy server, which fetches data on your behalf and masks your IP address.
Do I need to use a different proxy for each profile?
It’s recommended to use a different proxy for each browser profile. This helps avoid blocks or bans, prevents fingerprint linking and can maintain profile uniqueness. Especially for account management we advise using a different proxy for each profile.
Which features does the Incogniton app have?
- Free built-in proxies
- Team management
- Data storage
- Paste as human typing
- Data synchronization
- Selenium integration
- Cookies management
- Bulk creator profiles
- Fingerprint generator
How to add team members to your Incogniton profile?
To use the team management feature, go to Team management in the Incogniton app and click on New team member. Fill in all the details and click on save. Now, you can create customized roles for your users and assign team members to them.