How to Set Up a Bright Data Proxy in Incogniton

Are you ready to embark on a voyage of seamless internet surfing, fortified data security, and boundless opportunities, all in one? Look no further. This detailed guide serves as your gateway to unlocking the full potential of two exceptional tools — Bright Data proxy  and the renowned Incogniton anti detect browser

We will walk you through the process of signing up & setting up Bright Data proxies in Incogniton so you can take full advantage of the browser’s incredible multiple account management features alongside Bright Data’s 72M+ residential IPs.

Brightdata integration with Incogniton

Signing up and setting up The Proxies

To perfectly set up your Bright Data proxies in Incogniton without any room for errors, then follow these steps to get started.

Step 1. Create and set up your Incogniton Account 

Of course, you must have a functioning Incogniton account before integrating Bright data proxies. Download and set up the Incogniton app on your device by following the steps below:

  • Visit the official Incogniton website and locate the download page using the header navigation bar.
  • Click on the download button corresponding to your device’s operating system (Mac or Windows) to begin the download process.
  • Once the download is complete, proceed to install the Incogniton app on your device.
  • Return to the Incogniton homepage and navigate to the Pricing page to explore the available plans: Starter (free), entrepreneur, professional, and multinational. You may want to proceed with the free package for the sake of this process.
  • Follow the registration process as guided on the website to create your Incogniton account. Upon completion, you will receive login credentials for future access.
  • Finally, open the downloaded Incogniton app and sign in using the login details obtained during the registration process.

If you encounter any issues or require further assistance in setting up an Incogniton account, kindly reach out to help@incogniton.com for support. 

Step 2. Create Your Bright Data Account

The next step is to create your Bright Data account. Visit Bright Data’s official website and create your account by clicking the “Start free trial” button in the hero section.

Proceed to register with your details or via Google Authentication.

Step 3. Set Up The Proxy Portal

After creating your Bright Data account, visit the proxy portal. 

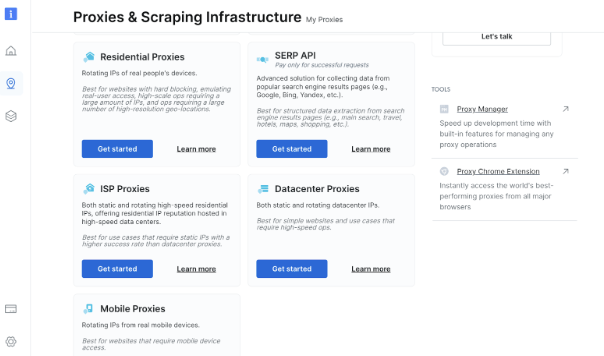
  • Click the “Proxies and Scraping data” icon on the sidebar, as shown in the image below. 
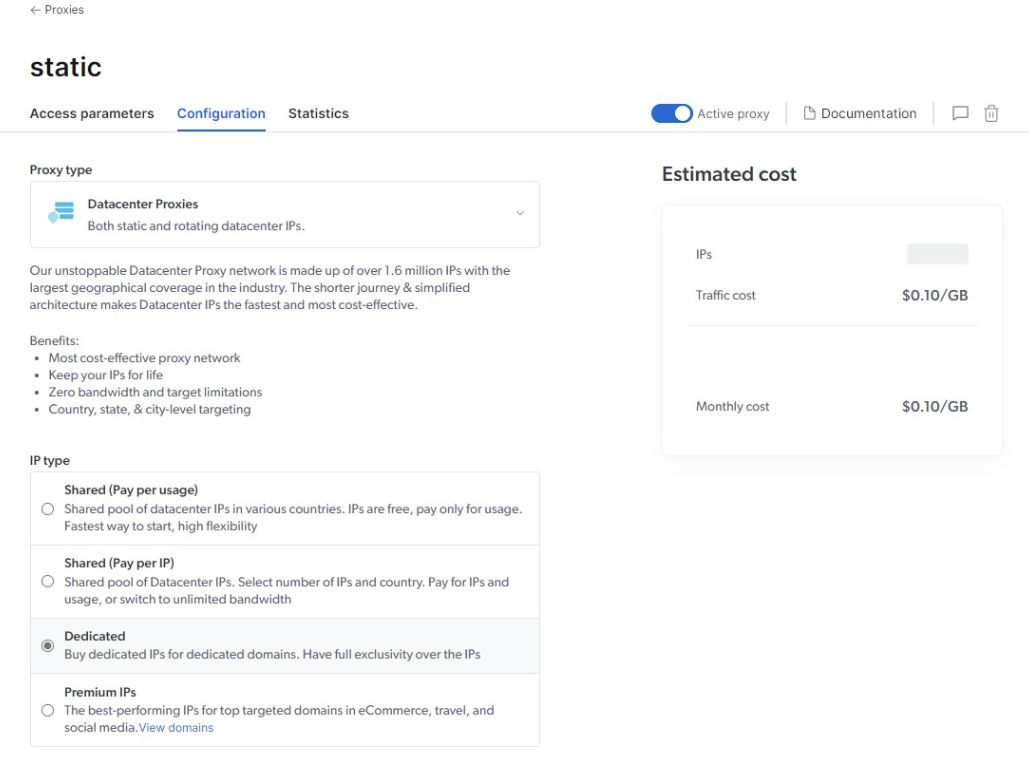
  • Next, you have to buy a dedicated datacenter IP. Select the Datacenter proxy and select the Dedicated option. See the image below.

Step 4. Configure The Proxy in the Portal 

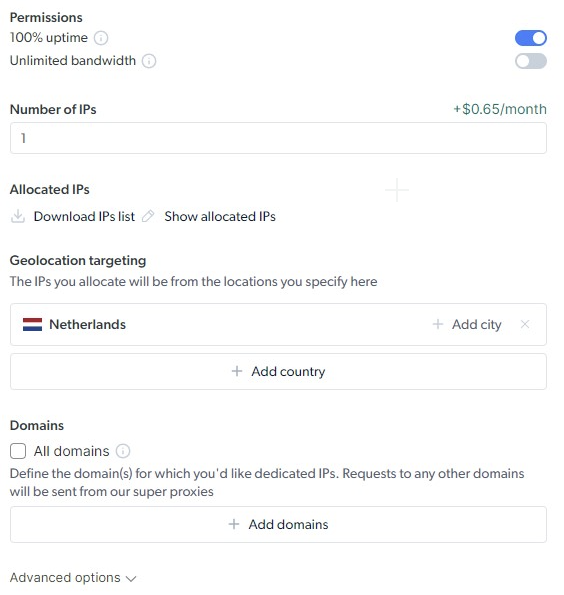
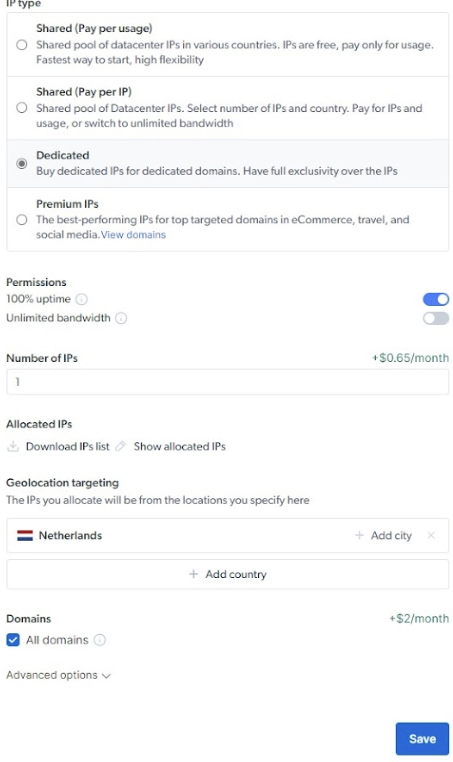
The 4th step requires you to configure the proxy in the portal just as shown in the images below.

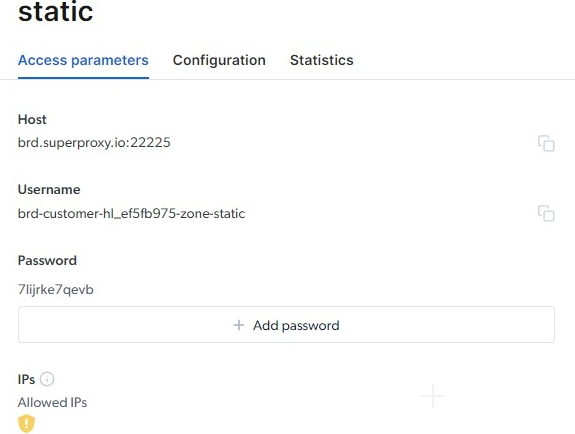
After configuration, you can now access your proxy details which you will have to paste into Incogniton in the next step.

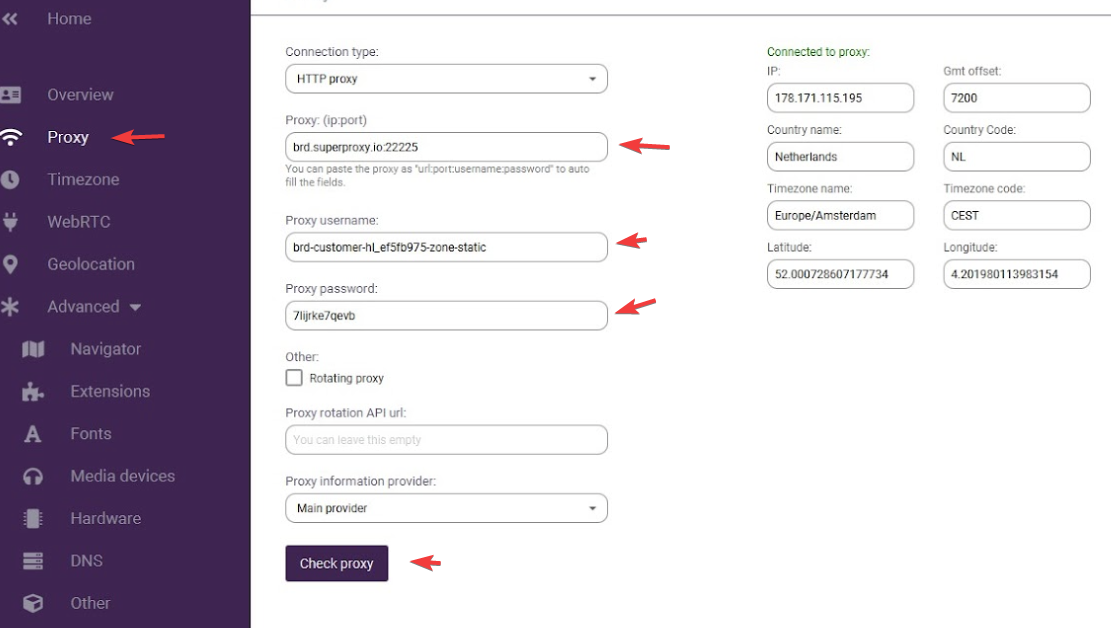
Step 5. Fill in All The Details Bright Data Provided You 

Please fill in all the fields requested by Bright Data before going further. Then click “check proxy” and “create profile” to start.

Type in the necessary information, such as the connection type (HTTP, HTTPS, SOCKS4 or SOCKS5).

Conclusion

With Bright Data’s impressive 99.9% uptime and more than 72M real devices residential IPs, integrating it with Incogniton makes for an indispensable tool for regular internet users, digital marketers, and developers alike. By leveraging the fastest residential proxy services in the industry, you can now navigate the internet freely, avoiding restrictions and blocks.

Enjoy the benefits of Incogniton’s effective multiple accounts management and seamless internet surfing, all backed by Bright Data’s exceptional features like 24/7 uptime for maximum stability.

What are you waiting for? Join >400K users now!

Frequently asked questions (FAQ)

Bright Data is a powerful & reliable platform that is simple to use and offers unmatched features, and some of them include:

  • Web Unlocker, and Mobile IP browsing
  • Users can browse from any location without any worry of being geo-restricted
  • Real-time traffic preview with data and logs
  • Rules for traffic splitting to optimize bandwidth and costs
  • Automatic retry rules for rejected requests
  • Managing markup modifications and solving captchas
  • A simple method for changing SSL fingerprint & headers
  • IP rerouting and session control.

A rotating proxy  is a method that alternates devices’ IP addresses on a regular basis. There are several freely available IP addresses in the proxy pool.

Rotating proxies provides a higher level of anonymity than ordinary proxies. In order to access vast numbers of IP addresses, proxy servers are employed in rotating proxies. Every time you connect, a random IP proxy is assigned, giving each website you visit that collects information about you a different IP address.

Bright Data is a platform that offers a flexible approach to web data retrieval, making it a valuable resource for data-driven decision-making across various industries and sectors. Bright Data assists its users in quickly gathering, tracking, and analyzing web data to improve their decision-making.

Bright Data is common among internet users because they give practical means to quickly and reliably collect large amounts of public online data, and deliver a great customer experience while being completely open and compliant.

A proxy browser is any internet browser that connects to a website or file through a proxy server rather than directly from the user’s device. The usage of proxy browsers allows users to browse the internet with utmost anonymity.

Please get in touch with us  if you have any further inquiries regarding how to use proxies with Incogniton.

A digital fingerprint is a unique set of characteristics that identify a device or user’s online presence. It includes information such as IP address, browser version, operating system, and other data that can be used to track and identify online activities.